- Changing the default Object factory: In order to change the Ojbect factory to Spring, you have to add a declaration in the struts.properties file.
struts.objectFactory = spring
struts.devMode = true
struts.enable.DynamicMethodInvocation = false
src/struts.properties - The Action class: Here is the code for the action class
package actions;

import java.util.List;

import business.BusinessInterface;

import com.opensymphony.xwork2.ActionSupport;

public class SearchAction extends ActionSupport {
private BusinessInterface businessInterface;

private String minSalary;

private String submit;

private List data;

public String getSubmit() {
 return submit;
}

public void setSubmit(String submit) {
 this.submit = submit;
}

public BusinessInterface getBusinessInterface() {
 return businessInterface;
}

  public String execute() throws Exception {
 try {
   long minSal = Long.parseLong(getMinSalary());
   System.out.println("Business Interface: " + businessInterface + "Minimum salary : " + minSal);
   data = businessInterface.getData(minSal);
   System.out.println("Data : " + data);

 } catch (Exception e) {
   e.printStackTrace();
 }

 return SUCCESS;
}

public void setBusinessInterface(BusinessInterface bi) {
 businessInterface = bi;
}

public String getMinSalary() {
 return minSalary;
}

public void setMinSalary(String minSalary) {
 this.minSalary = minSalary;
}

public List getData() {
 return data;
}

public void setData(List data) {
 this.data = data;
}
}
SearchAction.java - The Action class here does not have access to the HttpServetRequest and HttpServletResponse. Hence the action class itself was changed to the session scope for this example (see below)
- In order for the action class to be aware of the Http Session, the action class has to implement the ServletRequestAware interface, and define a setServletRequest method, which will be used to inject the ServletRequest into the action class.
- The BusinessInterface property is injected by Spring framework.
- The struts Configuration:
<!DOCTYPE struts PUBLIC
     "-//Apache Software Foundation//DTD Struts Configuration 2.0//EN"
     "http://struts.apache.org/dtds/struts-2.0.dtd">
<struts>
<package name="Struts2Spring" namespace="/actions" extends="struts-default">
 <action name="search" class="actions.SearchAction">
   <result>/search.jsp</result>
 </action>
</package>
</struts>
src/struts.xml - The action's class attribute has to map the id attribute of the bean defined in the spring bean factory definition.
- The Spring bean factory definition
<?xml version="1.0" encoding="UTF-8"?>
<beans xmlns="http://www.springframework.org/schema/beans" xmlns:xsi="http://www.w3.org/2001/XMLSchema-instance"
xsi:schemaLocation="http://www.springframework.org/schema/beans http://www.springframework.org/schema/beans/spring-beans-2.0.xsd http://www.springframework.org/schema/aop http://www.springframework.org/schema/aop/spring-aop-2.0.xsd"
default-autowire="autodetect">
<bean id="dataSource" class="org.apache.commons.dbcp.BasicDataSource" destroy-method="close">
 <property name="driverClassName">
   <value>oracle.jdbc.driver.OracleDriver</value>
 </property>
 <property name="url">
   <value>jdbc:oracle:thin:@localhost:1521:orcl</value>
 </property>
 <property name="username">
   <value>scott</value>
 </property>
 <property name="password">
   <value>tiger</value>
 </property>
</bean>

<!-- Configure DAO -->
<bean id="empDao" class="data.DAO">
 <property name="dataSource">
   <ref bean="dataSource"></ref>
 </property>
</bean>
<!-- Configure Business Service -->
<bean id="businessInterface" class="business.BusinessInterface">
 <property name="dao">
   <ref bean="empDao"></ref>
 </property>
</bean>
<bean id="actions.SearchAction" name="search" class="actions.SearchAction" scope="session">
    <property name="businessInterface" ref="businessInterface" />
  </bean>
</beans>
WEB-INF/applicationContext.xml - The bean definition for the action class contains the id attribute which matches the class attribute of the action in struts.xml
- Spring 2's bean scope feature can be used to scope an Action instance to the session, application, or a custom scope, providing advanced customization above the default per-request scoping.
- The web deployment descriptor
<?xml version="1.0" encoding="UTF-8"?>
<web-app id="WebApp_9" version="2.4" xmlns="http://java.sun.com/xml/ns/j2ee" xmlns:xsi="http://www.w3.org/2001/XMLSchema-instance"
xsi:schemaLocation="http://java.sun.com/xml/ns/j2ee http://java.sun.com/xml/ns/j2ee/web-app_2_4.xsd">

<display-name>Struts2Spring</display-name>

<filter>
 <filter-name>struts2</filter-name>
 <filter-class>org.apache.struts2.dispatcher.FilterDispatcher</filter-class>
</filter>

<filter-mapping>
 <filter-name>struts2</filter-name>
 <url-pattern>/*</url-pattern>
</filter-mapping>

<listener>
 <listener-class>org.springframework.web.context.ContextLoaderListener</listener-class>
</listener>
<listener>
 <listener-class>org.springframework.web.context.request.RequestContextListener</listener-class>
</listener>
<welcome-file-list>
 <welcome-file>index.html</welcome-file>
</welcome-file-list>
</web-app>
web.xml The only significant addition here is that of the RequestContextListener. This listener allows Spring framework, access to the HTTP session information. - The JSP file: The JSP file is shown below. The only change here is that the action class, instead of the Data list is accessed from the session.
<%@ page language="java" contentType="text/html; charset=ISO-8859-1" pageEncoding="ISO-8859-1"%>
<%@ taglib uri="http://displaytag.sf.net" prefix="display"%>
<%@ taglib prefix="s" uri="/struts-tags"%>
<%@ page import="actions.SearchAction,beans.Employee,business.Sorter,java.util.List,org.displaytag.tags.TableTagParameters,org.displaytag.util.ParamEncoder"%>
<html>
<head>
<title>Search page</title>
<link rel="stylesheet" type="text/css" href="/StrutsPaging/css/screen.css" />
</head>
<body bgcolor="white">
<s:form action="/actions/search.action">
<table>
  <tr>
    <td>Minimum Salary:</td>
    <td><s:textfield label="minSalary" name="minSalary" /></td>
  </tr>
  <tr>
    <td colspan="2"><s:submit name="submit" /></td>
  </tr>
</table>
</s:form>
<jsp:scriptlet>

 SearchAction action = (SearchAction)session.getAttribute("actions.SearchAction");
 session.setAttribute("empList", action.getData());
  if (session.getAttribute("empList") != null) {
   String sortBy = request.getParameter((new ParamEncoder("empTable")).encodeParameterName(TableTagParameters.PARAMETER_SORT));
   Sorter.sort((List) session.getAttribute("empList"), sortBy);

 </jsp:scriptlet>

<display:table name="sessionScope.empList" pagesize="4" id="empTable" sort="external" defaultsort="1" defaultorder="ascending" requestURI="">
<display:column property="empId" title="ID" sortable="true" sortName="empId" headerClass="sortable" />
<display:column property="empName" title="Name" sortName="empName" sortable="true" headerClass="sortable" />
<display:column property="empJob" title="Job" sortable="true" sortName="empJob" headerClass="sortable" />
<display:column property="empSal" title="Salary" sortable="true" headerClass="sortable" sortName="empSal" />
</display:table>
<jsp:scriptlet>
  }
 </jsp:scriptlet>

</body>
</html:html>
search.jsp - The Other required classes: The following other classes have been used for the example, and they can be obtained from the previous posts (1, 2).
- Employee.java
- BusinessInterface.java
- Sorter.java
- DAO.java
- EmpMapper.java
Monday, January 29, 2007
Integrating Struts 2.0 with Spring
In the past, I posted an example on how to use Displaytag with Struts and Spring, using Spring JDBC for data access(1, 2). In this post, I will describe how to do the same using Struts 2.0. The only major step that needs to be done here is to override the default Struts 2.0 OjbectFactory. Changing the ObjectFactory to Spring give control to Spring framework to instantiate action instances etc. Most of the code is from the previous post, but I will list only the additional changes here.
Tuesday, January 23, 2007
Spring: Prototype beans with Singletons - 2
The previous post described how to implement Lookup method injection and ServiceLocatorFactoryBean and BeanFactoryAware to enable singleton classes to use Prototype beans. This post will describe how to use Scoped beans (session or request or globalSession) from Spring managed beans in a Web application and also give the client servlet for testing the previous and the current examples.
Using in Web Applications
This is not for Singleton or Prototype beans. This solution is for using beans that are saved in the request of session scope. To implement this solution, you must inject an AOP proxy in place of the scoped bean, the proxy will then delegate the method call to the object that is in currently in the specified scope. All you have to do is to put the following in the bean definitionNewCommand.java
The Command Manager is shown belowCmdMgrWeb.java
The Servlet
The following is the servlet used for testing the beans used here.MethodInjectionServlet.java
The Web Deployment Descriptor
The web.xml file is shown below. You can see the two listeners required for using spring and the scoped beans.WEB-INF/web.xml
The Bean Definitions
The following is the code for the applicationContext.xml file. It is quite self explanatory.WEB-INF/applicationContext.xml
Using in Web Applications
This is not for Singleton or Prototype beans. This solution is for using beans that are saved in the request of session scope. To implement this solution, you must inject an AOP proxy in place of the scoped bean, the proxy will then delegate the method call to the object that is in currently in the specified scope. All you have to do is to put the following in the bean definition
<aop:scoped-proxy/>In the Web deployment descriptor (Shown in a following section), you will have to put a RequestContextListener in addition to the ContextLoaderListener. The RequestContextListener binds the HTTP request object to the Thread that is servicing that request. This makes beans that are request and session-scoped available further down the call chain (i.e. for spring managed beans invoked in the same thread of execution). For the Web Application scenario, I used a different Command bean shown below
package beans;

public class NewCommand {
private String someProperty;

public String getSomeProperty() {
return someProperty;
}

public void setSomeProperty(String someProperty) {
this.someProperty = someProperty;
}

public String execute() {
return "Command property : " + someProperty;
}
}
The Command Manager is shown below
package beans;

public class CmdMgrWeb {
private NewCommand command;

public Object process(String prop) {
command.setSomeProperty(prop);
return command.execute();
}

public NewCommand getCommand() {
return command;
}

public void setCommand(NewCommand command) {
this.command = command;
}
}
The Servlet
The following is the servlet used for testing the beans used here.
package servlets;

import java.io.IOException;
import java.io.PrintWriter;

import javax.servlet.ServletException;
import javax.servlet.http.HttpServletRequest;
import javax.servlet.http.HttpServletResponse;

import org.springframework.beans.factory.BeanFactory;
import org.springframework.web.context.WebApplicationContext;
import org.springframework.web.context.support.WebApplicationContextUtils;

import beans.CmdMgrNoBFA;
import beans.CmdMgrServiceFactory;
import beans.CmdMgrWeb;
import beans.CommandManager;
import beans.NewCommand;

public class MethodInjectionServlet extends javax.servlet.http.HttpServlet implements javax.servlet.Servlet {
public MethodInjectionServlet() {
super();
}

protected void doGet(HttpServletRequest request, HttpServletResponse response) throws ServletException, IOException {
WebApplicationContext context = WebApplicationContextUtils.getRequiredWebApplicationContext(getServletContext());
request.getSession().setAttribute("command", new NewCommand());
BeanFactory factory = (BeanFactory) context;
PrintWriter writer = response.getWriter();

CommandManager commandManager = (CommandManager) factory.getBean("commandManager");
writer.println(commandManager.process("test"));

CmdMgrNoBFA cmdMgrNoBFA = (CmdMgrNoBFA) factory.getBean("cmdMgrNoBFA");
writer.println(cmdMgrNoBFA.process("test"));

CmdMgrServiceFactory cmdMgrServiceFactory = (CmdMgrServiceFactory) factory.getBean("cmdMgrServiceFactory");
writer.println(cmdMgrServiceFactory.process("test"));

CmdMgrWeb cmdMgrWeb = (CmdMgrWeb) factory.getBean("cmdMgrWeb");
writer.println(cmdMgrWeb.process("test"));

}

}
The Web Deployment Descriptor
The web.xml file is shown below. You can see the two listeners required for using spring and the scoped beans.
<?xml version="1.0" encoding="UTF-8"?>
<web-app id="WebApp_ID" version="2.4" xmlns="http://java.sun.com/xml/ns/j2ee" xmlns:xsi="http://www.w3.org/2001/XMLSchema-instance"
xsi:schemaLocation="http://java.sun.com/xml/ns/j2ee http://java.sun.com/xml/ns/j2ee/web-app_2_4.xsd">
<display-name>MethodInjectionWeb</display-name>

<listener>
<listener-class>org.springframework.web.context.ContextLoaderListener</listener-class>
</listener>

<listener>
  <listener-class>org.springframework.web.context.request.RequestContextListener</listener-class>
</listener>

<servlet>
<description></description>
<display-name>MethodInjectionServlet</display-name>
<servlet-name>MethodInjectionServlet</servlet-name>
<servlet-class>servlets.MethodInjectionServlet</servlet-class>
</servlet>

<servlet-mapping>
<servlet-name>MethodInjectionServlet</servlet-name>
<url-pattern>/MethodInjectionServlet</url-pattern>
</servlet-mapping>

<welcome-file-list>
<welcome-file>default.jsp</welcome-file>
</welcome-file-list>
</web-app>
The Bean Definitions
The following is the code for the applicationContext.xml file. It is quite self explanatory.
<?xml version="1.0" encoding="UTF-8"?>
<beans xmlns="http://www.springframework.org/schema/beans" xmlns:xsi="http://www.w3.org/2001/XMLSchema-instance"
xmlns:aop="http://www.springframework.org/schema/aop"
xsi:schemaLocation="http://www.springframework.org/schema/beans http://www.springframework.org/schema/beans/spring-beans-2.0.xsd http://www.springframework.org/schema/aop http://www.springframework.org/schema/aop/spring-aop-2.0.xsd">

<bean id="command" class="beans.Command" scope="prototype"></bean>

<!-- Basic implementation by extending BeanFactoryAware -->
<bean id="commandManager" class="beans.CommandManager"></bean>

<!-- The lookup-method is implemented by Spring -->
<bean id="cmdMgrNoBFA" class="beans.CmdMgrNoBFA">
<lookup-method name="createCommand" bean="command" />
</bean>

<!-- Use Service locator factory to obtain a reference -->
<bean id="springServiceFactory" class="org.springframework.beans.factory.config.ServiceLocatorFactoryBean">
  <property name="serviceLocatorInterface" value="beans.ServiceFactory" />
</bean>

<bean id="cmdMgrServiceFactory" class="beans.CmdMgrServiceFactory">
<property name="serviceFactory" ref="springServiceFactory"></property>
</bean>


<!-- Using in Web Applications -->
<bean id="newCommand" class="beans.NewCommand" scope="session">
<aop:scoped-proxy />
</bean>

<bean id="cmdMgrWeb" class="beans.CmdMgrWeb">
<property name="command" ref="newCommand" />
</bean>
</beans>
Spring: Prototype beans with Singletons - 1
In a Spring application, when a singleton bean uses another singleton bean, or a non-singleton bean uses another non-singleton bean, setting one bean as a property of the other is quite adequate. But when the two beans are not of the same Scope i.e. When a singleton bean has to use a non-singleton (prototype) bean, the container will create the singleton bean just once, and the prototype bean that it depends on will also be set only once. The container cannot provide the Singleton bean with a new instance of the prototype bean each time it is needed. This post and the next describe four different approaches to address this problem.
The Command
The following is the code fo the Command class that will be used by the different Command Managers in the example.Command.java
Using BeanFactory Aware
In this approach, we delegate the creation of the prototype bean to the Singleton itself. This can be achieved by implementing the BeanFactoryAware interface as shown below.CommandManager.java
You can see here that the createCommand method uses the beanFactory.getBean() method to get the Command bean. This dependency on the Spring API is not that desirable.
Lookup Method Injection
Lookup method injection refers to the ability of the container to override methods on container managed beans, to return the result of looking up another named bean in the container.The Spring Framework implements this method injection by dynamically generating a subclass overriding the method, using bytecode generation via the CGLIB library. The command manager of the above implementation is changed in the following to allow lookup method injection.CmdMgrNoBFA.java
You can see here that the Command Manager does not implement the BeanFactoryAware interface. The createCommand was declared as abstract method, but it may also be defined here (the container will override it any way). The signature of the lookup method must have the following form
Using ServiceLocatorFactoryBean
Service locators help avoid the usage of the BeanFactory API using a custom locator interface. Service locators are typically used for prototype beans. Setter or constructor injection of the target bean is preferable, where the target bean is a Singleton. The custom locator interface shown below does not depend on the bean factory API.ServiceFactory.java
The corresponding Command Manager must have a ServiceFactory property that will be injected by the container. This is the code for the CommandManager used here.CmdMgrServiceFactory.java
Invoking the no-arg getCommand() method or the single-arg method with null, will return an instance of the Command object by matching it's type if there is only one bean of the type beans.Command. If there are more then beans.Command beans, then a NoSuchBeanDefinitionException is thrown. By default, the single string argument is matched to the bean names defined in the applicationContext.xml file. Alternatively, you can set a mapping of the string argument to bean names using a Properties object for mapping. This Properties object can be injected in using the serviceMappings property. Using with Web applications and rest of the definitions are in the next post.
| Using BeanFactoryAware | Forgo dependency injection. |
| Using Lookup Method Injection | Dynamically generate a subclass overriding the method, using bytecode generation via the CGLIB library |
| Using ServiceLocatorFactoryBean | A custom locator interface. |
| In Web Applications | Uses RequestContextListener in addition to ContextLoaderListener |
The Command
The following is the code fo the Command class that will be used by the different Command Managers in the example.
package beans;

public class Command {
private String someProperty;

public String getSomeProperty() {
 return someProperty;
}

public void setSomeProperty(String someProperty) {
 this.someProperty = someProperty;
}

public String execute() {
 return "Command property : " + someProperty;
}
}
Using BeanFactory Aware
In this approach, we delegate the creation of the prototype bean to the Singleton itself. This can be achieved by implementing the BeanFactoryAware interface as shown below.
package beans;

import org.springframework.beans.BeansException;
import org.springframework.beans.factory.BeanFactory;
import org.springframework.beans.factory.BeanFactoryAware;

public class CommandManager implements BeanFactoryAware {

private BeanFactory beanFactory;

public Object process(String prop) {
 Command command = createCommand();
 command.setSomeProperty(prop);
 return command.execute();
}

protected Command createCommand() {
 return (Command) this.beanFactory.getBean("command");
}

public void setBeanFactory(BeanFactory beanFactory) throws BeansException {
 this.beanFactory = beanFactory;
}
}
You can see here that the createCommand method uses the beanFactory.getBean() method to get the Command bean. This dependency on the Spring API is not that desirable.
Lookup Method Injection
Lookup method injection refers to the ability of the container to override methods on container managed beans, to return the result of looking up another named bean in the container.The Spring Framework implements this method injection by dynamically generating a subclass overriding the method, using bytecode generation via the CGLIB library. The command manager of the above implementation is changed in the following to allow lookup method injection.
package beans;

public abstract class CmdMgrNoBFA {
public Object process(String prop) {
 Command command = createCommand();
 command.setSomeProperty(prop);
 return command.execute();
}

protected abstract Command createCommand();
}
You can see here that the Command Manager does not implement the BeanFactoryAware interface. The createCommand was declared as abstract method, but it may also be defined here (the container will override it any way). The signature of the lookup method must have the following form
<public|protected> [abstract] <return-type> theMethodName(no-arguments);Note that beans that have been the target of method injection cannot be serialized.
Using ServiceLocatorFactoryBean
Service locators help avoid the usage of the BeanFactory API using a custom locator interface. Service locators are typically used for prototype beans. Setter or constructor injection of the target bean is preferable, where the target bean is a Singleton. The custom locator interface shown below does not depend on the bean factory API.
package beans;

public interface ServiceFactory {
public Command getCommand();
public Command getCommand(String beanName);
}
The corresponding Command Manager must have a ServiceFactory property that will be injected by the container. This is the code for the CommandManager used here.
package beans;

public class CmdMgrServiceFactory {
public ServiceFactory serviceFactory;

public Object process(String prop) {
 Command command = serviceFactory.getCommand("command");
 command.setSomeProperty(prop);
 return command.execute();
}

public ServiceFactory getServiceFactory() {
 return serviceFactory;
}

public void setServiceFactory(ServiceFactory serviceFactory) {
 this.serviceFactory = serviceFactory;
}

}
Invoking the no-arg getCommand() method or the single-arg method with null, will return an instance of the Command object by matching it's type if there is only one bean of the type beans.Command. If there are more then beans.Command beans, then a NoSuchBeanDefinitionException is thrown. By default, the single string argument is matched to the bean names defined in the applicationContext.xml file. Alternatively, you can set a mapping of the string argument to bean names using a Properties object for mapping. This Properties object can be injected in using the serviceMappings property. Using with Web applications and rest of the definitions are in the next post.
Monday, January 22, 2007
Implementing Observer Pattern in Java
The Observer pattern allows an object (an Observer) to watch another object (a Subject). The subject and observer to have a publish/subscribe relationship. Observers can register to receive events from the Subject. When the subject can update the Observers when certain expected events occur. In Design Patterns, the Observer Pattern is defined as
When To Use
Pros and Cons
Issues
ObserverTest.java
Define a one-to-many dependency between objects so that when one object changes state,The Observer pattern helps create a family of cooperating classes, while maintaining consistency and avoiding tight-coupling.
all its dependents are notified and updated automatically.
When To Use
- In a mailing list, where every time an event happens (a new product, a gathering, etc.) a message is sent to the people subscribed to the list.
- When a change to one object requires changing others, and you don't know how many objects need to be changed.
- When an object should be able to notify other objects without making assumptions about who these objects are (avoid tight-coupling).
Pros and Cons
- Loose coupling between Subject and Observer: The subject knows only a list of observers, that implement the Observer interface, it does no know the concrete implementation of the Observer.
- Broadcast communication: An event notification is broadcast observers irrespective of the number of Observers
- Unexpected updates: The can be blind to the cost of changing the subject.
Issues
- Mapping subjects to their observers: A subject can keep track it's observers as a list of all observer references or in a hash table, depending on whether space of time is the criteria respectively.
- Observing more than one subject: Using the Observer pattern you can implement a many-to-many relationship between subjects and observers. In this case, the Observer may need to know which subject is sending the notification. One way is to pass the Subject as an argument to the Update operation.
- Who triggers the update (Notify operation in Subject):
- State setting operation in subject to trigger Notify.
- Client trigger Notify at the right time.
- Dangling references to deleted subjects: Deleting a subject or a observer should not produce dangling references.
- Making sure subject state is self-consistent before notification: Otherwise, an observer can query subject's intermediate state through GetState operation.
- Avoiding observer-specific update protocols: push and pull models:
- Push model: subject sends details change information to observer, for this the subject has to know about the Observers.
- Pull model: subject sends minimum change information to observer and observer query for the rest of the information, as a result there might be more method calls that necessary.
- Specifying modifications of interest explicitly: One can register observer for only specific events. This can improve update efficiency.

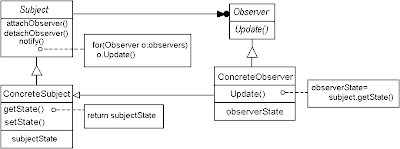
- Subject: Maintains a list of Observer references. Subject also provides an interface for attaching and detaching Observer objects.
- Observer: Defines an updating interface for objects that should be notified of changes in a subject.
- ConcreteSubject: Stores state of interest to ConcreteObserver objects and sends notifications to its observers upon state changes.
- ConcreteObserver: Maintains a reference to a ConcreteSubject object and a state that should stay consistent with the subject's.
package patterns;

import java.util.ArrayList;
import java.util.Iterator;
import java.util.List;

interface Subject {
 public void addObserver(Observer o);
 public void removeObserver(Observer o);
 public String getState();
 public void setState(String state);
}

interface Observer {
 public void update(Subject o);
}

class ObserverImpl implements Observer {
 private String state = "";

 public void update(Subject o) {
   state = o.getState();
   System.out.println("Update received from Subject, state changed to : " + state);
 }
}

class SubjectImpl implements Subject {
 private List observers = new ArrayList();

 private String state = "";

 public String getState() {
   return state;
 }

 public void setState(String state) {
   this.state = state;
   notifyObservers();
 }

 public void addObserver(Observer o) {
   observers.add(o);
 }

 public void removeObserver(Observer o) {
   observers.remove(o);
 }

 public void notifyObservers() {
   Iterator i = observers.iterator();
   while (i.hasNext()) {
     Observer o = (Observer) i.next();
     o.update(this);
   }
 }
}

public class ObserverTest {

 public static void main(String[] args) {
   Observer o = new ObserverImpl();
   Subject s = new SubjectImpl();
   s.addObserver(o);
   s.setState("New State");

 }
}
Thursday, January 18, 2007
EJB 3 Timer Service
Applications with business processes that are dependent on periodic notifications (for state transitions etc.) need a timer/scheduler service. In the past I posted how to use the Quartz Scheduler for scheduling jobs. In this post, I will describe the use of the EJB 3 Timer Service for scheduling, or temporal event driven processing.
The EJB Timer Service is a container-managed service that provides a way to allow methods to be invoked at specific times or time intervals. The EJB Timer may be set to invoke certain EJB methods at a specific time, after a specific duration, or at specific recurring intervals. The Timer Service is implemented by the EJB container and injected into the EJB through the EJBContext interface, or the EJB can access it through a JNDI lookup. In the example presented below, the EJB timer is set when the client invokes the startTimer method. The checkStatus() method is used to get the time left for the next timeout. The example was implemented on Glassfish server, with Eclipse 3.2 used for development.
Follow these steps to implement the example.
The EJB
The Timer Client
For this example, I used a web client. The client has a context listener which loads the timer when the application is deployed. A single servlet is used to invoke the checkStatus() method on the client.
Timer Service Additional Info (From the EJB 3.0 Specification)
The EJB Timer Service is a container-managed service that provides a way to allow methods to be invoked at specific times or time intervals. The EJB Timer may be set to invoke certain EJB methods at a specific time, after a specific duration, or at specific recurring intervals. The Timer Service is implemented by the EJB container and injected into the EJB through the EJBContext interface, or the EJB can access it through a JNDI lookup. In the example presented below, the EJB timer is set when the client invokes the startTimer method. The checkStatus() method is used to get the time left for the next timeout. The example was implemented on Glassfish server, with Eclipse 3.2 used for development.
Follow these steps to implement the example.
The EJB
- The EJB interface: The interface for the EJB is shown below.
package ejb;

public interface ITimedBean {
public String checkStatus();
public void startTimer();
}
ITimedBean.java - The Bean: The following is the code for the EJB followed by a brief explanation
package ejb;

import java.util.Collection;
import java.util.Iterator;

import javax.annotation.Resource;
import javax.ejb.Remote;
import javax.ejb.SessionContext;
import javax.ejb.Stateless;
import javax.ejb.Timeout;
import javax.ejb.Timer;

@Stateless(mappedName="ejb/timedBean")
@Remote
public class TimedBean implements ITimedBean {

@Resource
private SessionContext ctx;

public void startTimer() {
  ctx.getTimerService().createTimer(1000, 1000, null);
  System.out.println("Timers set");

}

public String checkStatus() {
  Timer timer = null;
  Collection timers = ctx.getTimerService().getTimers();
  Iterator iter = timers.iterator();
  while (iter.hasNext()) {
    timer = (Timer) iter.next();

    return ("Timer will expire after " + timer.getTimeRemaining() + " milliseconds.");
  }
  return ("No timer found");

}

  @Timeout
  public void handleTimeout(Timer timer) {
    System.out.println("HandleTimeout called.");

  }
}
TimedBean.java - The @Stateless(mappedName="ejb/timedBean") annotation declares the bean as a stateless EJB. The mappedName attribute defines the global JNDI name to which this EJB will be bound.
- In the startTimer method, the ctx.getTimerService().createTimer(1000, 1000, null); call is used to create the timer, this call will create a timer that invokes the methods at specific intervals. Another way to create a timer would be to use the call ctx.getTimerService().createTimer(1000, null);, in which case, the timer will invoke the EJB method just once.
- The EJB 3 Timer Service also allows you to send client-specific information at timer creation, throught the public Timer createTimer(long initialDuration, long intervalDuration, java.io.Serializable info); and some overloaded methods as shown below in the TimerService interface.
public interface javax.ejb.TimerService {

public Timer createTimer(long duration,java.io.Serializable info);

public Timer createTimer(long initialDuration,long intervalDuration, java.io.Serializable info);

public Timer createTimer(java.util.Date expiration,java.io.Serializable info);

public Timer createTimer(java.util.Date initialExpiration,long intervalDuration, java.io.Serializable info);

public Collection getTimers();
} - A timer may be cancelled at any time, by using the cancel() method in the Timer interface.
- The @Timeout annotation declares the handleTimeout() method to be a callback method for the timer.
- Deploying: When deploying on Glassfish using the Admin console, check the "Generate RMI Stubs in a Jar File" option. The Jar file will be created in the GLASSFISH_HOME/domains/DOMAIN_NAME/generated/xml/j2ee-modules/APPLICATION_NAME directory.
The Timer Client
For this example, I used a web client. The client has a context listener which loads the timer when the application is deployed. A single servlet is used to invoke the checkStatus() method on the client.
- Start with a Dynamic Web Application in Eclipse. Include the generated client Jar file as a dependency.
- The Context Listener: The code for the context listener is shown below.
package servlets;

import javax.ejb.EJB;
import javax.servlet.ServletContextEvent;
import javax.servlet.ServletContextListener;

import ejb.ITimedBean;

public class LoadTimer implements ServletContextListener {
@EJB(name="timerBean", mappedName="corbaname:iiop:localhost:3700#ejb/timedBean")
private ITimedBean timerBean;

public void contextInitialized(ServletContextEvent servletcontextevent) {
  System.out.println("Starting timer");
  timerBean.startTimer();
}

public void contextDestroyed(ServletContextEvent servletcontextevent) {

}

public ITimedBean getTimerBean() {
  return timerBean;
}

public void setTimerBean(ITimedBean timerBean) {
  this.timerBean = timerBean;
}

}
LoadTimer.java
You will notice that the Context listener has a timerBean field with @EJB annotation. The mapped name for the EJB is defined to be the full JNDI name.@EJB(name="timerBean", mappedName="corbaname:iiop:localhost:3700#ejb/timedBean")
This is only needed in case of remote deployments on different clusters. In the same cluster you could simply use "ejb/timedBean". - The Servlet: The servlet is has a similar @EJB annotation.
package servlets;

import java.io.IOException;

import javax.ejb.EJB;
import javax.servlet.ServletException;
import javax.servlet.http.HttpServletRequest;
import javax.servlet.http.HttpServletResponse;

import ejb.ITimedBean;

public class TimerClient extends javax.servlet.http.HttpServlet implements javax.servlet.Servlet {
@EJB(name="timerBean", mappedName="corbaname:iiop:localhost:3700#ejb/timedBean")
private ITimedBean timerBean;

protected void service(HttpServletRequest request, HttpServletResponse response) throws ServletException, IOException {
  response.getWriter().println(timerBean.checkStatus());
  response.getWriter().println(timerBean.checkStatus());
  response.getWriter().println(timerBean.checkStatus());

}

public ITimedBean getTimerBean() {
  return timerBean;
}

public void setTimerBean(ITimedBean timerBean) {
  this.timerBean = timerBean;
}
}
TimerClient.java - The Deployment descriptor: The deployment descriptor is listed below.
<?xml version="1.0" encoding="UTF-8"?>
<web-app version="2.5" xmlns="http://java.sun.com/xml/ns/javaee" xmlns:xsi="http://www.w3.org/2001/XMLSchema-instance"
xsi:schemaLocation="http://java.sun.com/xml/ns/javaee http://java.sun.com/xml/ns/javaee/web-app_2_5.xsd">
<display-name>TimerClientWeb</display-name>
<listener>
  <listener-class>servlets.LoadTimer</listener-class>
</listener>
<servlet>
  <description></description>
  <display-name>TimerClient</display-name>
  <servlet-name>TimerClient</servlet-name>
  <servlet-class>servlets.TimerClient</servlet-class>
</servlet>

<servlet-mapping>
  <servlet-name>TimerClient</servlet-name>
  <url-pattern>/timerClient</url-pattern>
</servlet-mapping>
<welcome-file-list>
  <welcome-file>default.jsp</welcome-file>
</welcome-file-list>
</web-app>
web.xml
Timer Service Additional Info (From the EJB 3.0 Specification)
- Invocations of the methods to create and cancel timers and of the timeout callback method are typically made within a transaction.
- If the transaction is rolled back, the timer creation is rolled back and so is the case with timer cancellation.
- If container-managed transaction demarcation is used and the REQUIRED or REQUIRES_NEW transaction attribute is specified or defaulted (Required or RequiresNew if the deployment descriptor is used), the container must begin a new transaction prior to invoking the timeout callback method.
- If the transaction fails or is rolled back, the container must retry the timeout at least once.
- Timers survive container crashes, server shutdown, and the activation/passivation and load/store cycles of the enterprise beans that are registered with them.
- Since the timeout callback method is an internal method of the bean class, it has no client security context. When getCallerPrincipal is called from within the timeout callback method, it returns the container's representation of the unauthenticated identity.
Wednesday, January 17, 2007
Securing Java EE 5 Web Applications
In this post I will give a brief overview of securing web applications in Java EE 5 with the help of a simple example. The example application consists of a Servlet (securityServlet) and two pages (index.jsp and secure/index.jsp). Two users (newemployee and newguest) with roles employee and guest, will be created, with the following permissions
Create Users in Glassfish
- The "guest" user will have access to index.jsp
- The "employee" user will have access to secure/index.jsp.
- Both users have access to the servlet.
Create Users in Glassfish
- Go to Configuration->Security->Realms->file in the Glassfish admin console.
- In the file realm, click on manage users.
- Add new users by clicking on add there.
- The Web Deployment Descriptor: The following listing shows the complete deployment descriptor used for this example, followed by a quick explanation.
<?xml version="1.0" encoding="UTF-8"?>
<web-app xmlns="http://java.sun.com/xml/ns/javaee" version="2.5" xmlns:xsi="http://www.w3.org/2001/XMLSchema-instance"
xsi:schemaLocation="http://java.sun.com/xml/ns/javaee http://java.sun.com/xml/ns/javaee/web-app_2_5.xsd">
<display-name>Java5Security</display-name>

<servlet>
 <description></description>
 <display-name>SecurityServlet</display-name>
 <servlet-name>SecurityServlet</servlet-name>
 <servlet-class>servlets.SecurityServlet</servlet-class>
    <security-role-ref>
      <role-name>emp</role-name>
      <role-link>employee</role-link>
    </security-role-ref>
</servlet>
<servlet-mapping>
 <servlet-name>SecurityServlet</servlet-name>
 <url-pattern>/securityServlet</url-pattern>
</servlet-mapping>

<login-config>
 <auth-method>FORM</auth-method>
  <realm-name>file</realm-name>
 <form-login-config>
   <form-login-page>/login.jsp</form-login-page>
   <form-error-page>/error.jsp</form-error-page>
 </form-login-config>
</login-config>

<security-constraint>
 <web-resource-collection>
   <web-resource-name>Protected Area</web-resource-name>
   <url-pattern>/*</url-pattern>
   <http-method>PUT</http-method>
   <http-method>DELETE</http-method>
   <http-method>GET</http-method>
   <http-method>POST</http-method>
 </web-resource-collection>
 <auth-constraint>
   <role-name>guest</role-name>
   <role-name>employee</role-name>
 </auth-constraint>
</security-constraint>

<security-constraint>
 <web-resource-collection>
   <web-resource-name>Protected Area</web-resource-name>
   <url-pattern>/secure/*</url-pattern>
   <http-method>PUT</http-method>
   <http-method>DELETE</http-method>
   <http-method>GET</http-method>
   <http-method>POST</http-method>
 </web-resource-collection>
 <auth-constraint>
   <role-name>employee</role-name>
 </auth-constraint>
</security-constraint>
<!-- Security roles referenced by this web application -->
<security-role>
 <role-name>guest</role-name>
</security-role>
<security-role>
 <role-name>employee</role-name>
</security-role>

<welcome-file-list>
 <welcome-file>index.html</welcome-file>
</welcome-file-list>
</web-app>
WEB-INF/web.xml - In the servlet declaration, the <security-role-ref> element maps the rolename used in the servlet to role declared in the deployment descritpor (this is needed only when the role declared in the deployment descriptor is different from the role used in the servlet (employee and emp)).
- In the login-config, the <realm-name> element is used to declare the realm in which authentication takes place
- Realms: A realm is a database of users and groups that identify valid users of a Web application and are controlled by the same authentication policy. Three realms, file, admin-realm, and certificate realms come preconfigured in Glassfish Application Server. For this example I use the file realm, where the user credentials are stored locally in a file.
- Mapping Roles to Users/Groups in Security Realm: In order to map the roles used in the application to the users defined in the security realm, you have to add the role mappings in the WEB-INF/sun-web.xml. The file is shown below.
<?xml version="1.0" encoding="UTF-8"?>
<!DOCTYPE sun-web-app PUBLIC "-//Sun Microsystems, Inc.//DTD Application Server 8.1 Servlet 2.4//EN" "http://www.sun.com/software/appserver/dtds/sun-web-app_2_4-1.dtd">
<sun-web-app>
<context-root>/Java5Security</context-root>
  <security-role-mapping>
    <role-name>guest</role-name>
    <principal-name>newguest</principal-name>
  </security-role-mapping>
  <security-role-mapping>
    <role-name>employee</role-name>
    <principal-name>newemployee</principal-name>
  </security-role-mapping>
</sun-web-app>
WEB-INF/sun-web.xml - The Servlet: The following is a listing of the servlet used for this example
package servlets;

import java.io.IOException;
import java.io.PrintWriter;

import javax.annotation.security.DeclareRoles;
import javax.servlet.ServletException;
import javax.servlet.http.HttpServletRequest;
import javax.servlet.http.HttpServletResponse;

@DeclareRoles("emp")
public class SecurityServlet extends javax.servlet.http.HttpServlet implements
 javax.servlet.Servlet {

public SecurityServlet() {
 super();
}

protected void service(HttpServletRequest request,
   HttpServletResponse response) throws ServletException, IOException {
 PrintWriter out = response.getWriter();
    if (request.isUserInRole("emp"))

   out.println(request.getUserPrincipal() + " is an Authorized User");
 else
   out.println(request.getUserPrincipal() + " is not an Authorized to see this page.");
}
}
SecurityServlet.java - The @DeclareRoles annotation is used to define the security roles in the application. This annotation is specified on a class, and it typically would be used to define roles that could be tested (i.e., by calling isUserInRole) from within the methods of the annotated class.
- The isUserInRole() method is from J2EE.
- The login page: The following is the listing for the login.jsp page. There is nothing new here.
<%@ taglib prefix='c' uri='http://java.sun.com/jstl/core'%>
<html>
<head>
<title>Login</title>
</head>

<body>
<h1>Login</h1>

<h2>Hello, please login:</h2>
<br>
<br>
<form action="j_security_check" method=post>
<table>
<tr>
<td>User:</td>
<td><input type="text" name="j_username" size="25"></td>
</tr>
<tr>
<td>Password:</td>
<td><input type='password' name='j_password'></td>
</tr>

<tr>
<td colspan='2'><input name="submit" type="submit"></td>
</tr>
<tr>
<td colspan='2'><input name="reset" type="reset"></td>
</tr>
</table>

</form>
</body>
</html>
/login.jsp - The index.jsp and error.jsp could be any JSP page
- This post did not describe how to logout. But that has been discussed earlier in the Form-based Authentication Logout post.
Tuesday, January 16, 2007
Handling Oracle Large Objects with JDBC
LOBs (Large OBjects) are are designed to support large unstructured data such as text, images, video etc. Oracle supports the following two types of LOBs:
Working with LOB Data
CLOB and the BLOB objects are not created and managed in the same way as the ordinary types such as VARCHAR. To work with LOB data, you must first obtain a LOB locator. Then you can read or write LOB data and perform data manipulation. Use the ResultSet's getBlob method to obtain the LOB locator, and then you can obtain the a Stream of the blob to read/write to the BlobBlobTest.java
Insert Blob into Oracle
The insertBlob method takes the image id and the image file name as arguments. If the image file is an empty string, then an empty blob is inserted into the table. The empty_blob() function returns an empty locator of type BLOB, this is used in the INSERT.
Read from a Blob
The getBinaryStream of java.sql.Blob class returns an InputStream, which can be used to read from the blob.
Write to a Blob
The writeBlob method writes to the first row retrieved from the table. The SQL statement uses FOR UPDATE. In the absence of FOR UPDATE, you will get an IOException
- Character Large Object (CLOB) and Binary Large Object(BLOB) are stored in the database either in-line in the table or in a separate segment or tablespace.
- BFILEs are large binary data objects stored in operating system files outside of database tablespaces.
Working with LOB Data
CLOB and the BLOB objects are not created and managed in the same way as the ordinary types such as VARCHAR. To work with LOB data, you must first obtain a LOB locator. Then you can read or write LOB data and perform data manipulation. Use the ResultSet's getBlob method to obtain the LOB locator, and then you can obtain the a Stream of the blob to read/write to the Blob
Blob blob = rs.getBlob(1);The following example shows how to insert, read and write Blobs to Oracle from Java. The table here has only two columns (IMAGE_ID and IMAGE) IMAGE is a BLOB.
InputStream is = blob.getBinaryStream();
OutputStream os = blob.setBinaryStream(1);
package data;

import java.io.FileInputStream;
import java.io.FileOutputStream;
import java.io.InputStream;
import java.io.OutputStream;
import java.sql.Blob;
import java.sql.Connection;
import java.sql.DriverManager;
import java.sql.PreparedStatement;
import java.sql.ResultSet;
import java.sql.SQLException;
import java.sql.Statement;

public class BlobTest {

 public void insertBlob(String imageId, String fileName) {
   Connection conn = null;
   try {
     conn = getConnection();
     if (!fileName.equals("")) {
       PreparedStatement ps = conn.prepareStatement("INSERT INTO IMAGES VALUES(?, ?)");
       ps.setString(1, imageId);
       FileInputStream fis = new FileInputStream(fileName);
       ps.setBinaryStream(2, fis, fis.available());
       ps.execute();
       ps.close();
     } else {
       PreparedStatement ps = conn.prepareStatement("INSERT INTO IMAGES VALUES (?, empty_blob())");
       ps.setString(1, imageId);
       ps.execute();
       ps.close();

     }
     conn.close();
   } catch (Exception e) {
     e.printStackTrace();
   }
 }

 public void readBlob(String fileName) {
   Connection conn = null;
   try {
     conn = getConnection();
     Statement st = conn.createStatement();
     ResultSet rs = st.executeQuery("SELECT IMAGE FROM IMAGES");
     while (rs.next()) {
        // The following two lines can be replaced by
        // InputStream is = rs.getBinaryStream(1);
       Blob blob = rs.getBlob(1);
       InputStream is = blob.getBinaryStream();
       FileOutputStream fos = null;

       fos = new FileOutputStream("c:/TEMP/" + fileName);
       byte[] data = new byte[1024];
       int i = 0;
       while ((i = is.read(data)) != -1) {
         fos.write(data, 0, i);
       }
     }
     conn.close();

   } catch (Exception e) {
     e.printStackTrace();
   }
 }

 public void writeBlob(String fileName) {
   Connection conn = null;
   try {
     conn = getConnection();
     Statement st = conn.createStatement();
     ResultSet rs = st.executeQuery("SELECT IMAGE FROM IMAGES FOR UPDATE");
     while (rs.next()) {
       Blob blob = rs.getBlob(1);
       System.out.println(blob);
        OutputStream os = blob.setBinaryStream(1);
       FileInputStream fis = null;
       fis = new FileInputStream("c:/TEMP/" + fileName);
       byte[] data = new byte[1];
       int i;
       while ((i = fis.read(data)) != -1) {
         os.write(data, 0, i);
       }
       os.close();
       break;
     }
     conn.close();

   } catch (Exception e) {
     e.printStackTrace();
   }
 }

 private Connection getConnection() throws ClassNotFoundException, SQLException {
   Class.forName("oracle.jdbc.driver.OracleDriver");
   Connection conn = DriverManager.getConnection("jdbc:oracle:thin:@localhost:1521:ORCL", "scott", "tiger");
   return conn;
 }

 public static void main(String[] args) {
   BlobTest blobTest = new BlobTest();
   blobTest.insertBlob("img1", "");
   blobTest.writeBlob("2.gif");

 }
}
Insert Blob into Oracle
The insertBlob method takes the image id and the image file name as arguments. If the image file is an empty string, then an empty blob is inserted into the table. The empty_blob() function returns an empty locator of type BLOB, this is used in the INSERT.
Read from a Blob
The getBinaryStream of java.sql.Blob class returns an InputStream, which can be used to read from the blob.
Write to a Blob
The writeBlob method writes to the first row retrieved from the table. The SQL statement uses FOR UPDATE. In the absence of FOR UPDATE, you will get an IOException
java.io.IOException: ORA-22920: row containing the LOB value is not lockedThe following article describes how to handle CLOB using JDBC
at oracle.jdbc.driver.DatabaseError.SQLToIOException(DatabaseError.java:517)
at oracle.jdbc.driver.OracleBlobOutputStream.flushBuffer(OracleBlobOutputStream.java:214)
at oracle.jdbc.driver.OracleBlobOutputStream.close(OracleBlobOutputStream.java:179)
at data.BlobTest.writeBlob(BlobTest.java:90)
at data.BlobTest.main(BlobTest.java:111)
Monday, January 15, 2007
Implementing Visitor Pattern in Java
The Visitor design pattern provides a way to separate algorithms from the object structure. A consequence of this separation is the ability to add new operations to existing object structures without modifying those structures. In design patterns, the authors define the Visitor Pattern as
Skip to Sample Code
The idea is to have two class hierarchies
When to Use
Use the Visitor pattern when
Pros and Cons
Visitor Pattern and Double Dispatch
Double dispatch is a mechanism that allows a function call to change depending on the runtime types of multiple objects involved in the call. In single dipatch a call like Integer.compareTo(Object o), the actual function call depends only on the calling object (the Integer object here). In double dispatch, the actual call may also depend on the object being passed as a parameter to the compareTo method.
The most common programming languages (except for LISP) do not have a way for implementing double dispatch. But you may implement double dispatch in these programming languages using the Visitor pattern. You can see the implementation in the following example. Here the call to accept depends not only on the type of object on which it is called (MyLong or MyInteger) but also on the parameter that is being passed to it (AddVisitor and SubtractVisitor).VisitorTest.java
Represent an operation to be performed on the elements of an object structure.
Visitor lets you define a new operation without changing the classes
of the elements on which it operates.
Skip to Sample Code
The idea is to have two class hierarchies
- One for the elements being operated on, where each element has an "accept" method that takes a visitor object as an argument
- One for the visitors that define operations on the elements. Each visitor has a visit() method for each element class.

- Visitor: Declares the visit method.
- ConcreteVisitor: An implementation of the Visitor interface. May also store state if required.
- Element (or Visitable): The interface that declares the accept method. The accept method invokes the visit method passing itself as an argument.
- ConcreteElement: Element of the object structure. Has to implement accept method (implements Element).
When to Use
Use the Visitor pattern when
- There is a need perform operations that depend on concrete classes of an object structure, and the structure may contain classes of objects with differing interfaces.
- Distinct and unrelated operations must be performed on objects in an object structure, and you want to avoid distributing/replicating similar operations in their classes
- The classes defining the object structure rarely change, but new operations may be added every once in a while.
Pros and Cons
- Easy to add new operations: To add a new operation, you only have to add a new Visitor implementation. There is no need to change the element classes.
- Gather related operations: Visitor pattern helps gather related operations into the visitor, while the unrelated behavior is implemented in the individual elements.
- Visiting across class hierarchies: Unlike iterators, visitors may visit objects in an object structure which need not have objects of the same type.
- State Management: Visitors can keep track of state changes with each visit. Without a visitor, state has to be passed as an argument.
- Hard to add new concrete elements: Adding a ConcreteElement involves adding a new operation to the Visitor interface and a corresponding implementation in each concrete visitor implementation. Visitor pattern is best used in cases where the object structure is stable but the set of operations may change frequently.
- Breaking Encapsulation: Visitor pattern often forces you to provide public operations to access the internal state of the elements, which compromises encapsulation.
Visitor Pattern and Double Dispatch
Double dispatch is a mechanism that allows a function call to change depending on the runtime types of multiple objects involved in the call. In single dipatch a call like Integer.compareTo(Object o), the actual function call depends only on the calling object (the Integer object here). In double dispatch, the actual call may also depend on the object being passed as a parameter to the compareTo method.
The most common programming languages (except for LISP) do not have a way for implementing double dispatch. But you may implement double dispatch in these programming languages using the Visitor pattern. You can see the implementation in the following example. Here the call to accept depends not only on the type of object on which it is called (MyLong or MyInteger) but also on the parameter that is being passed to it (AddVisitor and SubtractVisitor).
package visitor;

interface Visitor {
public int visit(MyInteger wheel);

public int visit(MyLong engine);
}

interface Visitable {
public int accept(Visitor visitor);
}

class MyInteger implements Visitable {
private int value;

MyInteger(int i) {
this.value = i;
}

public int accept(Visitor visitor) {
return visitor.visit(this);
}

public int getValue() {
return value;
}
}

class MyLong implements Visitable {
private long value;

MyLong(long l) {
this.value = l;
}

public int accept(Visitor visitor) {
return visitor.visit(this);
}

public long getValue() {
return value;
}
}

class SubtractVisitor implements Visitor {
int value;

public SubtractVisitor(int value) {
this.value = value;
}

public int visit(MyInteger i) {
System.out.println("Subtract integer");
return (i.getValue() - value);
}

public int visit(MyLong l) {
System.out.println("Subtract long");
return ((int) l.getValue() - value);
}

}

class AddVisitor implements Visitor {
int value;

public AddVisitor(int value) {
this.value = value;
}

public int visit(MyInteger i) {
System.out.println("Adding integer");
return (value + i.getValue());
}

public int visit(MyLong l) {
System.out.println("Adding long");
return (value + (int) l.getValue());
}

}

public class VisitorTest {
public static void main(String[] args) {
AddVisitor cv = new AddVisitor(10);
SubtractVisitor sv = new SubtractVisitor(10);
MyInteger i = new MyInteger(20);
MyLong l = new MyLong(20);
System.out.println(i.accept(cv));
System.out.println(l.accept(cv));

System.out.println(i.accept(sv));
System.out.println(l.accept(sv));

}
}
Thursday, January 11, 2007
Implementing Web Services with Spring and Axis
In the past, I wrote a post on how to implement Web Services using JAX-WS on Glassfish, and Apache Axis. In this post I will describe how to implement Web Services using the Spring framework and Apache Axis. The spring framework uses JAX-RPC API to help implement and access SOAP-WSDL based Web Services. The main components required for implementing and accessing Web Services in Spring are:
Creating the Web Service
The example contains a simple Web Service that echoes back the request message to the client. Follow these steps to imlement the Web Service
The Web Service Client
- JaxRpcPortProxyFactoryBean: This is a proxy factory for proxies that communicate with backend Web Services.
- ServletEndPointSupport: This is the base class for Web Service End Points. A Web Service end point is a class that will be exposed as a Web Service.
Creating the Web Service
The example contains a simple Web Service that echoes back the request message to the client. Follow these steps to imlement the Web Service
- Start with a dynamic web project in Eclipse.
- The Service Interface: The following is the code for the Service Interface. Nothing new here.
package service;

public interface ISpringWS {

public String sayHello(String message);

}
ISpringWS.java - The Service Implementation: The following is the code for the Service Implementation. Again, it's a simple POJO.
package service;

public class SpringWS implements ISpringWS {

public String sayHello(String message) {
 System.out.println("sayHello:" + message);
 return "You said '" + message + "'";
}
}
SpringWS.java - The Service Endpoint: Here is the code for the Service Endpoint, followed by an explanation
package service;

import org.springframework.remoting.jaxrpc.ServletEndpointSupport;

public class SpringWSEndPoint extends ServletEndpointSupport implements ISpringWS {
private ISpringWS springWS;

protected void onInit() {
 this.springWS = (ISpringWS) getWebApplicationContext().getBean("springWS");
}

public String sayHello(String message) {
 return springWS.sayHello(message);
}
}
SpringWSEndPoint.java
To implement Web Services using the Spring framework, a service endpoint class has to be written for each service. The service endpoint generally delegates the requests to the Spring-managed beans which implement the actual web service. The service endpoint, however, is not managed by Spring, but by the Web Service too (Axis in our case). Also note that the Service Endpoint implements the Service Interface, since this class acts is the interface to the Web Service. - The server configuration: In order to use Axis as the deployment tool for the web service, you have to add a service section to the Axis server-config.wsdd file. Here is the file in full.
<?xml version="1.0" encoding="UTF-8"?>
<deployment xmlns="http://xml.apache.org/axis/wsdd/" xmlns:java="http://xml.apache.org/axis/wsdd/providers/java">
<globalConfiguration>
 <parameter name="adminPassword" value="admin" />
 <parameter name="sendXsiTypes" value="true" />
 <parameter name="sendMultiRefs" value="true" />
 <parameter name="sendXMLDeclaration" value="true" />
 <parameter name="axis.sendMinimizedElements" value="true" />
 <requestFlow>
   <handler type="java:org.apache.axis.handlers.JWSHandler">
     <parameter name="scope" value="session" />
   </handler>
   <handler type="java:org.apache.axis.handlers.JWSHandler">
     <parameter name="scope" value="request" />
     <parameter name="extension" value=".jwr" />
   </handler>
 </requestFlow>
</globalConfiguration>
<handler name="Authenticate" type="java:org.apache.axis.handlers.SimpleAuthenticationHandler" />
<handler name="LocalResponder" type="java:org.apache.axis.transport.local.LocalResponder" />
<handler name="URLMapper" type="java:org.apache.axis.handlers.http.URLMapper" />
<service name="AdminService" provider="java:MSG">
 <parameter name="allowedMethods" value="AdminService" />
 <parameter name="enableRemoteAdmin" value="false" />
 <parameter name="className" value="org.apache.axis.utils.Admin" />
 <namespace>http://xml.apache.org/axis/wsdd/</namespace>
</service>
<service name="SpringWS" provider="java:RPC">
  <parameter name="allowedMethods" value="*" />
  <parameter name="className" value="service.SpringWSEndPoint" />
</service>
<service name="Version" provider="java:RPC">
  <parameter name="allowedMethods" value="getVersion" />
  <parameter name="className" value="org.apache.axis.Version" />
</service>
<transport name="http">
 <requestFlow>
   <handler type="URLMapper" />
   <handler type="java:org.apache.axis.handlers.http.HTTPAuthHandler" />
 </requestFlow>
</transport>
<transport name="local">
 <responseFlow>
   <handler type="LocalResponder" />
 </responseFlow>
</transport>
</deployment>
WEB-INF/server-config.wsdd - The spring application context: Here is the applicationContext.xml used for the example
<?xml version="1.0" encoding="UTF-8"?>
<!DOCTYPE beans PUBLIC "-//SPRING//DTD BEAN//EN" "http://www.springframework.org/dtd/spring-beans.dtd">
<beans>
<bean id="springWSEndpoint" class="service.SpringWSEndPoint"></bean>
<bean id="springWS" class="service.SpringWS"></bean>
</beans>
WEB-INF/applicationContext.xml - The Web deployment descriptor
<?xml version="1.0" encoding="UTF-8"?>
<web-app id="WebApp_ID" version="2.4" xmlns="http://java.sun.com/xml/ns/j2ee" xmlns:xsi="http://www.w3.org/2001/XMLSchema-instance"
xsi:schemaLocation="http://java.sun.com/xml/ns/j2ee http://java.sun.com/xml/ns/j2ee/web-app_2_4.xsd">
<display-name>WSSpring</display-name>
<welcome-file-list>
 <welcome-file>index.jsp</welcome-file>
</welcome-file-list>

<listener>
 <listener-class>org.springframework.web.context.ContextLoaderListener</listener-class>
</listener>

<servlet>
  <servlet-name>axis</servlet-name>
  <servlet-class>org.apache.axis.transport.http.AxisServlet</servlet-class>
  <load-on-startup>5</load-on-startup>
</servlet>
<servlet-mapping>
  <servlet-name>axis</servlet-name>
  <url-pattern>/axis/*</url-pattern>
</servlet-mapping>
</web-app>
WEB-INF/web.xml The Axis servlet definition enables the Axis servlet to make the service available under the given port name. - Jar files: Here is a list of the jar files used for this example
axis.jar Available for download at Apache Axis website commons-discovery.jar Available with the Spring framework with dependencies download, or here. commons-logging.jar Available with the Spring framework with dependencies download, or here. jaxrpc.jar Available with the Spring framework with dependencies download. log4j-1.2.13.jar Available with the Spring framework with dependencies download, or here. saaj.jar Available with the Spring framework with dependencies download. spring.jar No need to say where. wsdl4j-1.5.1.jar Available with the Spring framework with dependencies download. - Deploy and Test: Deploy the application in Weblogic 9.2. You can test the service at the URL
http://localhost:7001/WSSpring/axis/SpringWS?wsdl
The Web Service Client
- Start with a dynamic web project in Eclipse and include all the above jar files.
- Service Interface: The service interface can be generated using any of the tools that create Java classes using the WSDL file. For this example, simply copy the ISpringWS.java file into the client application.
package service;

public interface ISpringWS {

public String sayHello(String message);

}
ISpringWS.java - The client: The client is a simple Java class, with the service as a member. This will be injected by the spring framework.
package client;

import service.ISpringWS;

public class SpringWSClient {
ISpringWS springWS;

public String callService() {
 return springWS.sayHello("Hello");
}

public ISpringWS getSpringWS() {
 return springWS;
}

public void setSpringWS(ISpringWS springWS) {
 this.springWS = springWS;
}

}
SpringWSClient.java - The Client Servlet:
package servlets;

import java.io.IOException;

import javax.servlet.ServletException;
import javax.servlet.http.HttpServletRequest;
import javax.servlet.http.HttpServletResponse;
import org.springframework.web.context.WebApplicationContext;
import org.springframework.web.context.support.WebApplicationContextUtils;
import client.SpringWSClient;

public class WSSpringClientServlet extends javax.servlet.http.HttpServlet implements javax.servlet.Servlet {

public WSSpringClientServlet() {
 super();
}

protected void service(HttpServletRequest request, HttpServletResponse response) throws ServletException, IOException {
 WebApplicationContext ctx = WebApplicationContextUtils.getRequiredWebApplicationContext(this.getServletContext());
  SpringWSClient sender = (SpringWSClient) ctx.getBean("springWSClient");
 String result = sender.callService();
 response.getWriter().println(result);
 response.getWriter().close();
}
}
WSSpringClientServlet.java - The Application context: You can see the definition of the JaxRpcPortProxyFactoryBean here. This class was described briefly earlier in the post.
<?xml version="1.0" encoding="UTF-8"?>
<!DOCTYPE beans PUBLIC "-//SPRING//DTD BEAN//EN" "http://www.springframework.org/dtd/spring-beans.dtd">
<beans>
<bean id="jaxRpcProxy" class="org.springframework.remoting.jaxrpc.JaxRpcPortProxyFactoryBean">
  <property name="serviceFactoryClass">
    <value>org.apache.axis.client.ServiceFactory</value>
  </property>
  <property name="wsdlDocumentUrl">
    <value>http://localhost:7001/WSSpring/axis/SpringWS?wsdl</value>
  </property>
  <property name="namespaceUri">
    <value>http://localhost:7001/WSSpring/axis/SpringWS</value>
  </property>
  <property name="serviceName">
    <value>SpringWSEndPointService</value>
  </property>
  <property name="portName">
    <value>SpringWS</value>
  </property>
  <property name="serviceInterface">
    <value>service.ISpringWS</value>
  </property>

</bean>
<bean id="springWSClient" class="client.SpringWSClient">
 <property name="springWS" ref="jaxRpcProxy" />
</bean>

</beans>
WEB-INF/applicationContext.xml
The service interface used here is a plain Java interface. Using the definition this way will turn service invocations into dynamic JAX-RPC calls (using JAX-RPC's Dynamic Invocation Interface). Another way to implement this is to have the Service interface extend java.rmi.Remote, and have a definition of portInterface. - The web deployment descriptor:
<?xml version="1.0" encoding="UTF-8"?>
<web-app id="WebApp_ID" version="2.4" xmlns="http://java.sun.com/xml/ns/j2ee" xmlns:xsi="http://www.w3.org/2001/XMLSchema-instance"
xsi:schemaLocation="http://java.sun.com/xml/ns/j2ee http://java.sun.com/xml/ns/j2ee/web-app_2_4.xsd">
<display-name>WSSpringClient</display-name>

<listener>
 <listener-class>org.springframework.web.context.ContextLoaderListener</listener-class>
</listener>
<servlet>
 <description></description>
 <display-name>WSSpringClientServlet</display-name>
 <servlet-name>WSSpringClientServlet</servlet-name>
 <servlet-class>servlets.WSSpringClientServlet</servlet-class>
</servlet>
<servlet-mapping>
 <servlet-name>WSSpringClientServlet</servlet-name>
 <url-pattern>/WSSpringClientServlet</url-pattern>
</servlet-mapping>


<welcome-file-list>
 <welcome-file>index.html</welcome-file>

</welcome-file-list>
</web-app>
WEB-INF/web.xml
Monday, January 08, 2007
Implementing Decorator Pattern in Java
In the Decorator pattern, a decorator object is wrapped around the original object. This is typically achieved having the original object as a member of the decorator, with the decorator forwarding the requests to the original object and also implementing the new functionality. The decorator must conform to the interface of the original object (the object being decorated). In Design Patterns, the authors define the Decorator pattern as:
Usage Scenarios
Here is the UML diagram of the Decorator pattern followed by a description of the various involved components.
The following is sample implementation of the Decorator pattern in Java.
Attach additional responsibilities to an object dynamically. DecoratorsSkip to Sample Code
provide a flexible alternative to subclassing for extending functionality.
Usage Scenarios
- Add responsibilities to individual objects dynamically and transparently, that is, without affecting other objects.
- Be able to withdraw responsibilities
For example: The java.util.Collections.unmodifiableCollection(Collection) removies the ability to change a given collection by wrapping it with a decorator that throws an UnSupportedException when you try to modify the Collection. - When extension by subclassing is impractical, such as when a large number of independent extensions produce an explosion of subclasses to support every combination. Or a class is unavailable for subclassing.
Here is the UML diagram of the Decorator pattern followed by a description of the various involved components.

- Component: Defines the interface for objects that can have responsibilities added to them dynamically.
- ConcreteComponent: Defines an object to which additional responsibilities can be attached.
- Decorator: maintains a reference to a Component object and defines an interface that conforms to Component's interface.
- ConcreteDecorator: adds responsibilities to the component.
The following is sample implementation of the Decorator pattern in Java.
- The Component Interface
package decorator;

public interface IComponent {
public void doStuff();
}
IComponent.java - The Concrete Component
package decorator;

public class Component implements IComponent{
public void doStuff() {
System.out.println("Do Suff");
}

}
Component.java - The Decorator
package decorator;

public interface Decorator extends IComponent {
public void addedBehavior();
}
Decorator.java Note: The decorator interface has to conform to the component interface, hence it extends IComponent. - The Concrete Decorator
package decorator;

public class ConcreteDecorator implements Decorator {

IComponent component;

public ConcreteDecorator(IComponent component) {
super();
this.component = component;
}

public void addedBehavior() {
System.out.println("Decorator does some stuff too");

}

public void doStuff() {
component.doStuff();
addedBehavior();

}

}
ConcreteDecorator.java - The Client
import decorator.*;

public class Client {
public static void main(String[] args) {
IComponent comp = new Component();
Decorator decorator = new ConcreteDecorator(comp);
decorator.doStuff();
}

}
Client.java
Friday, January 05, 2007
Implementing Web Services using JAX-WS
Previously, I wrote a post describing the use of Apache Axis to create and consume Web Services from Java. In this post, I will describe how to use JAX-WS to create and consume web services. I used Glassfish application server for this application. The Web service and the Web Service client are both web applications.
The ServiceThe Web deployment desciptor: web.xml The Client
For this example I used a web application as a client. A servlet that invokes the actual Web Service client, and the Web Service client class which uses invokes the web method.
The Service
- Create a dynamic web project in Eclipse
- Create the Web Service End point
import javax.jws.WebMethod;
import javax.jws.WebService;
@WebService
public class JaxWsService {
 @WebMethod
 public String sayHello(String message) {
   System.out.println("sayHello:" + message);
   return "You said '" + message + "'";
 }
}
JaxWsService.java - @WebService annotation is used to denote a Web Service End point.
- Alternatively, you can have a Service End Point Interface (SEI). An SEI declares methods that can be invoked by clients.
- Generate artifacts required for deploying, using wsgen: The wsgen.bat file is located in the GLASSFISH_HOME/bin directory. The following command can be used to create the artifacts
C:\workspaces\WebServices\JaxWsTest\src>wsgen -classpath ../build/classes/ -wsdl -s . ws.JaxWsService
You can see that I ran wsgen from my src directory (the project was created in eclipse). - Export the WAR file and deploy on Glassfish. To verify, go to the glassfish administrative console -> Web Services, you should see a Web service installed by the name JaxWsService. You might get an exception as shown below
Error loading deployment descriptors for module [WebServicesEAR] -- (class: com/sun/xml/ws/modeler/RuntimeModeler, method: processRpcMethod signature: (Lcom/sun/xml/ws/model/JavaMethod;Ljava/lang/String;Ljavax/jws/WebMethod;Ljava/lang/String;Ljava/lang/reflect/Method;Ljavax/jws/WebService;)V) Incompatible argument to funct
This is due to JAXWS/JWSDP binaries in the classpath. Remove any WS jar files (appserv-ws.jar, webservices-tools.jar etc.) from your class path.
<?xml version="1.0" encoding="UTF-8"?>
<web-app xmlns="http://java.sun.com/xml/ns/javaee" version="2.5" xmlns:xsi="http://www.w3.org/2001/XMLSchema-instance"
xsi:schemaLocation="http://java.sun.com/xml/ns/javaee http://java.sun.com/xml/ns/javaee/web-app_2_5.xsd">  <display-name>JaxWsTest</display-name>
 <welcome-file-list>
   <welcome-file>default.jsp</welcome-file>
 </welcome-file-list>
</web-app>
For this example I used a web application as a client. A servlet that invokes the actual Web Service client, and the Web Service client class which uses invokes the web method.
- Create a dynamic web application in Eclipse.
- Generate the required artifacts using wsimport command. The command I used is shown below.
C:\workspaces\WebServices\JaxWsClientWeb\src>wsimport -s . http://localhost:8080/JaxWsTest/JaxWsServiceService?wsdl
- Write the Servlet: The servlet uses the @WebServiceRef annotation, so that the server can inject the Web service reference into the servlet. The following is the code for the servlet.
import java.io.IOException;

import javax.servlet.ServletException;
import javax.servlet.http.HttpServletRequest;
import javax.servlet.http.HttpServletResponse;
import javax.xml.ws.WebServiceRef;

import ws.JaxWsServiceService;

import client.JaxWsClient;

public class JaxWsClientServlet extends javax.servlet.http.HttpServlet implements javax.servlet.Servlet {

  @WebServiceRef(wsdlLocation = "http://localhost:8080/JaxWsTest/JaxWsServiceService?wsdl")
  JaxWsServiceService service;

 public JaxWsClientServlet() {
   super();
 }

 protected void service(HttpServletRequest request, HttpServletResponse response) throws ServletException, IOException {
   JaxWsClient client = new JaxWsClient(service);
   response.getWriter().println(client.callService());
   response.getWriter().close();
 }
}
JaxWsClientServlet.java - Write the client class: The client class is a simple Java class, which uses the Service references generated by the wsimport command to invoke the Web Service. Following is the code for the client class.
import ws.JaxWsService;
import ws.JaxWsServiceService;

public class JaxWsClient {
 JaxWsServiceService service;

 public JaxWsClient(JaxWsServiceService service) {
   this.service = service;
 }

 public String callService() {
    JaxWsService port = service.getJaxWsServicePort();
    String result = port.sayHello("Hello");
   return result;
 }
}
JaxWsClient - The Web Deployment Descriptor
<?xml version="1.0" encoding="UTF-8"?>
<web-app xmlns="http://java.sun.com/xml/ns/javaee" version="2.5" xmlns:xsi="http://www.w3.org/2001/XMLSchema-instance"
  xsi:schemaLocation="http://java.sun.com/xml/ns/javaee http://java.sun.com/xml/ns/javaee/web-app_2_5.xsd">
  <display-name>JaxWsTest</display-name>
 <display-name>JaxWsClientWeb</display-name>
 <servlet>
   <description></description>
   <display-name>clientServlet</display-name>
   <servlet-name>clientServlet</servlet-name>
   <servlet-class>servlets.JaxWsClientServlet</servlet-class>
 </servlet>
 <servlet-mapping>
   <servlet-name>clientServlet</servlet-name>
   <url-pattern>/clientServlet</url-pattern>
 </servlet-mapping>
 <welcome-file-list>
   <welcome-file>default.jsp</welcome-file>
 </welcome-file-list>
</web-app>
web.xml - Export WAR file and deploy. To test go to
http://localhost:8080/JaxWsClientWeb/clientServlet
Thursday, January 04, 2007
Unit Testing with JUnit 4.0
JUnit 4 introduces a completely different API to the older versions. JUnit 4 uses Java 5 annotations to describe tests instead of using inheritence. It introduces more flexible initialization and cleanup, timeouts, and parameterized test cases. This post describes the new features in JUnit 4, and in the end, I show a basic example that tests the java.util.Stack class.StackTest.java
- The tests: Unlike in JUnit 3.x you don't have to extend TestCase to implement tests. A simple Java class can be used as a TestCase. The test methods have to be simply annotated with org.junit.Test annotation as shown below
@Test
public void emptyTest() {
 stack = new Stack<String>();
 assertTrue(stack.isEmpty());
} - Using Assert Methods: In JUnit 4 test classes do not inherit from TestCase, as a result, the Assert methods are not available to the test classes. In order to use the Assert methods, you have to use either the prefixed syntax (Assert.assertEquals()) or, use a static import for the Assert class.
import static org.junit.Assert.*;
Now the assert methods may be used directly as done with the previous versions of JUnit. - Changes in Assert Methods: The new assertEquals methods use Autoboxing, and hence all the assertEquals(primitive, primitive) methods will be tested as assertEquals(Object, Object). This may lead to some interesting results. For example autoboxing will convert all numbers to the Integer class, so an Integer(10) may not be equal to Long(10). This has to be considered when writing tests for arithmetic methods. For example, the following Calc class and it's corresponding test CalcTest will give you an error.
public class Calc {
 public long add(int a, int b) {
  return a+b;
 }
}
Calc.java import org.junit.Test;
import static org.junit.Assert.assertEquals;
public class CalcTest {
@Test
public void testAdd() {
assertEquals(5, new Calc().add(2, 3));
}
}CalcTest.java You will end up with the following error.java.lang.AssertionError: expected:<5> but was:<5>
This is due to autoboxing. By default all the integers are cast to Integer, but we were expecting long here. Hence the error. In order to overcome this problem, it is better if you type cast the first parameter in the assertEquals to the appropriate return type for the tested method as followsassertEquals((long)5, new Calc().add(2, 3));
There are also a couple of methods for comparing Arrayspublic static void assertEquals(String message, Object[] expecteds, Object[] actuals);
public static void assertEquals(Object[] expecteds, Object[] actuals); - Setup and TearDown: You need not have to create setup and teardown methods for setup and teardown. The @Before, @After and @BeforeClass, @AfterClass annotations are used for implementing setup and teardown operations. The @Before and @BeforeClass methods are run before running the tests. The @After and @AfterClass methods are run after the tests are run. The only difference being that the @Before and @After can be used for multiple methods in a class, but the @BeforeClass and @AfterClass can be used only once per class.
- Parameterized Tests: JUnit 4 comes with another special runner: Parameterized, which allows you to run the same test with different data. For example, in the the following peice of code will imply that the tests will run four times, with the parameter "number" changed each time to the value in the array.
@RunWith(value = Parameterized.class)
The requirement for parameterized tests is to
public class StackTest {
Stack<Integer> stack;
private int number;
public StackTest(int number) {
this.number = number;
}
@Parameters
public static Collection data() {
Object[][] data = new Object[][] { { 1 }, { 2 }, { 3 }, { 4 } };
return Arrays.asList(data);
}
...
}- Have the annotation @RunWith for the Test Class
- Have a public static method that returns a Collection for data. Each element of the collection must be an Array of the various paramters used for the test.
- You will also need a public constructor that uses the parameters
- Test Suites: In JUnit 3.8 you had to add a suite() method to your classes, to run all tests as a suite. With JUnit 4 you use annotations instead. To run the CalculatorTest and SquareTest you write an empty class with @RunWith and @Suite annotations.
import org.junit.runner.RunWith;
The "Suite" class takes SuiteClasses as argument which is a list of all the classes that can be run in the suite.
import org.junit.runners.Suite;
@RunWith(Suite.class)
@Suite.SuiteClasses({StackTest.class})
public class AllTests {
}
package tests;

import static org.junit.Assert.assertEquals;
import static org.junit.Assert.assertTrue;

import java.util.Arrays;
import java.util.Collection;
import java.util.EmptyStackException;
import java.util.Stack;

import org.junit.After;
import org.junit.Before;
import org.junit.Test;
import org.junit.runner.RunWith;
import org.junit.runners.Parameterized;
import org.junit.runners.Parameterized.Parameters;

@RunWith(value = Parameterized.class)
public class StackTest {
 Stack<Integer> stack;

 private int number;

 public StackTest(int number) {
   this.number = number;
 }

 @Parameters
 public static Collection data() {
   Object[][] data = new Object[][] { { 1 }, { 2 }, { 3 }, { 4 } };
   return Arrays.asList(data);
 }

 @Before
 public void noSetup() {
   stack = new Stack<Integer>();
 }

 @After
 public void noTearDown() {
   stack = null;
 }

 @Test
 public void pushTest() {
   stack.push(number);
   assertEquals(stack.peek(), number);

 }

 @Test
 public void popTest() {
 }

 @Test(expected = EmptyStackException.class)
 public void peekTest() {
   stack = new Stack<Integer>();
   stack.peek();
 }

 @Test
 public void emptyTest() {
   stack = new Stack<Integer>();
   assertTrue(stack.isEmpty());
 }

 @Test
 public void searchTest() {
 }
}
Subscribe to:
Posts (Atom)