- Create a JMS Server
- In the admin console go to Home > Summary of Services: JMS > Summary of JMS Servers and click on Lock & Edit and then click on New.
- In the next screen choose a name and create a new File Store and click next.
- Select the deployment target and finish.

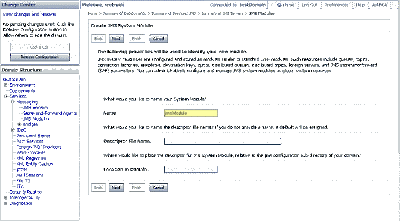
- Create a JMS Module: Go to JMS Modules in the Admin console and create a new module, accept defaults.

- Create a Connection Factory: Go to Home > JMS Modules > jmsModule. Select new and create a new connection factory. Set the JNDI name to jms/connectionFactory
- Create a Destination: Go to Home > JMS Modules > jmsModule and Create a new Queue and set the JNDI name to jms/testQueue. When creating a queue, select "create a new Sub deployment" and create a new sub-deployment.

Wednesday, December 06, 2006
Messaging Quickstart: Configuring Weblogic JMS
This is a basic example of how to implement Messaging in Java using JMS and Message driven beans. The example is implemented using Weblogic JMS implementation. This part describes how to configure a queue on weblogic, the next part will describe the programming involved to run the example.Follow these steps to configure a queue in Weblogic:
Subscribe to:
Post Comments (Atom)
Popular Posts
-
This post will describe how to create and deploy a Java Web Application war to Heroku using Heroku CLI. You will need a basic understanding ...
-
JUnit 4 introduces a completely different API to the older versions. JUnit 4 uses Java 5 annotations to describe tests instead of using in...
-
In a previous post, I described how to use Quartz scheduler for scheduling . In this post, I describe the configuration changes required for...
-
In the past, I had a few posts on how to implement pagination using displaytag( 1 , 2 ). That solution is feasible only with small result se...
-
Displaytag is an opensource tag library that can be used to display tables on JSPs. Apart from being able to display tables, the displaytag...
-
Last week, I described how to implement JMS, using a stand-alone client and a Message Driven Bean . In this post and the next, I will descr...
-
The previous post described how to implement a JMS messaging client using Spring JMS . This post will describe how to implement the Message ...
-
In this post we will see how to do an offline install Jenkins and required plugins on a Red Hat Enterprise Linux Server release 7.3. This is...
-
The previous post described how to setup a Queue in Weblogic Server . This post shows the code necessary to run a Simple Messaging example u...
-
Redhat Enterprise Linux provides Redhat Developer Toolset , which allows you to install Git. However, it is usually an older version. If you...
When I try to run a simple test program using this configuration, I get to the point of sending the message (using Spring) and get this message:
ReplyDeleteUnable to resolve 'jms.testQueue'. Resolved 'jms']; remaining name 'testQueue'
Any ideas what could be wrong here? Anyone seen this before?
Hi,
ReplyDeleteI also got the same problem. But I resolved.
Please target your queue to JMSserver, This problem will resolve.
Some really useful stuff on here, keep up posting. Cheers.
ReplyDeleteYou have touched some nice factors here. Any way keep up wrinting
ReplyDeleteI was seeking this particular info for a long time.
ReplyDeleteI will definitely recommend your website to everyone.
ReplyDeleteWrite more high-quality articles. I support you.
ReplyDeleteReally informative site. Thank you!!
ReplyDeletePlease keep sharing more such blog. click it
ReplyDelete